Showing posts with label master bedroom. Show all posts

10 May 2010

check ME out! i'm on brooklyn limestone!

how very exciting! i've been an avid follower (along with thousands of other folks) of "a brooklyn limestone in progress" since stumbling upon it a year ago - just when i was starting to daydream about how this old house would take shape.

aside from being insanely talented (seriously, check out her before-and-afters on apartment therapy), stefanie, the author of brooklyn limestone, is so lovely and gracious with her feedback and time.

today i am thrilled to be included on her blog, filling in as a guest poster while she is away on yet another glamorous trip.

please stop by and check out my post -- and leave a comment so she'll consider having me back!

jen x

27 January 2010

come sail away, come sail away...

come SAIL AWAY WITH ME! (to slumbertown, that is!)

so, finally, the big reveal! after months of teasers, my master bedroom is finally "done enough" to share. (*w00t!*)

to remind you, here's what we started with:

so, i searched and searched for a photo with a better angle, but this was the best i could find (see more "befores" here). like the rest of the house, the master bedroom was dingy and painted in a color best described as "resembling the contents of a baby's diaper". it was also carpeted and covered in stains. this hid 8-10 layers of paint and (miraculously) the original floors.

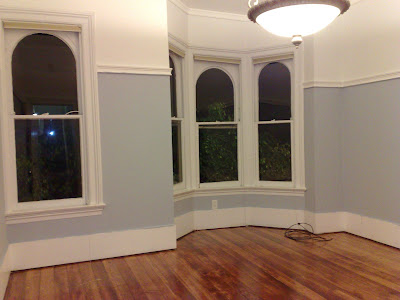
first we got down to painting (and painting, painting, painting). for this room, i chose "solana beach" from ace hardware - a gorgeous grey-blue. my tastes tend more toward the wild, but i wanted my bedrooms to feel relaxed and serene.

after the painting was done, minus all of the touch ups (will. they. ever. end?!), we could remove the carpets (or "built in drop-cloths" as i liked to refer to them) and restore the floors. here's what we got - yay! wide-plank, old-growth pine i think. *SWOON* (sorry for the bad photo quality - i took it with my phone and was VERY, VERY tired at this point.)

more on that process here and here if you're curious. (including fun photos of the "lee press-on" nails and sunflower seeds we found, *gag*.)

and, now, TA-DA! here it is!

the bed (ikea), like in my guest bedroom, is outfitted almost exclusively in white. i like to feel like i'm jumping into a cloud, whether it's bed time or daytime nap time (which happens much more frequently than i should really admit).

i added the silver throw from west elm for a bit of shine (i'm a TOTAL MAGPIE and collect as many sparkly things as i can) and used various white patterned sheets for texture.

and for height and a bit of glamour, i made silk curtains to match the walls. i think it makes the room look almost like it's floating - in a good way! (and here's the 10-step tutorial if you'd like to make some for yourself.)

the nightstands were my grandmother's. i toyed with the idea of painting them but, in the end, i like how they ground the room and bring the floor color up to eye-level. just need to find the right lamp(s) to add. maybe this one?

my dressers are both from ikea. i loved the soft grey finish and the curvy legs. hated the pulls they supplied, so i trotted down to anthro and picked up some "diamond gal" knobs to finish them. love that they manage to look both luxe and organic at the same time. and i placed my grandmother's sewing machine (cleverly disguised as a side table) next to the low one for extra table-top real estate. it makes me smile.

and, because i love color, i painted the insides of my closet doors in "hot lips" (or something like that). you can check out more on project doorway here.

finally, i added all of my favorite jewelry, one great piece of artwork that i picked up at auction...

and that notorious (and polarizing) ship chandelier from zgallerie.

like you've undoubtedly guessed, i love quirky things and wanted one piece that really SAYS SOMETHING in this bedroom. i think this one says it well. come on and sing along...

26 January 2010

t-minus 2 days!

my baby!

well, i've been promising to unveil my master bedroom for months now. you've listened, patiently, to my litany of excuses - but the hour is ALMOST upon us!

so, yes, i am one of those insane fools that purchased the much-blogged-about ship chandelier. it has been languishing in a corner in my bedroom for ages, giving me the sad-eyes the entire time.

*skies open up* well, i have finally found a new contractor (that i hope will not disappoint me like the last) and he's scheduled to hang this lovely ship in my master bedroom on thursday afternoon (while i slave over 200 cupcakes for my dear friends', sandra and john, wedding on friday).

and, yes, i know that it's simple to hang a light fixture but i am REALLY VERY klutzy. so, if it involves potential electrocution, i say "pass, thanks!"

while he's at it, he'll also hang this beauty (the gold one, not the kit-cat) in my office, though i still have a LOT to do in there, so that reveal will take some time...

are you excited? i'm excited! like, head about to explode excited - seriously! OR "omg! martha's being released from jail and i can finally worship my domesticity goddess again" excited!

23 November 2009

curtain call. (10 easy steps to silk curtains.)


i don't want to show you TOO much of my bedroom and ruin the surprise (i'm still waiting on my bedding and my AMAZING chandelier), but i thought some of you might find this quick tutorial helpful.

one of the best ways to create a bit of drama in a room, and to give it some added height and "dimension", is to add some great window treatments. i, personally, have a fondness for silk dupioni curtains - but i find the price for ready-made prohibitive. i mean, like, FAINT-WORTHY prohibitive.

because i am blessed with a bedroom that has 12-foot ceilings and 4 very tall windows, the ones i browsed at pottery barn (the tallest they've got) were $179 PER PANEL. multiply by 4 and throw in the rods and clips and liners and i just about had a HEART ATTACK. (plus, i'll be honest, i just don't like shopping there.)

instead, i found two FANTASTIC sources of silk online, silkuneed.com and silkbaron.com. they both carry loads of lovely colors and all for $9.99 a yard or less. i spoke with the owner of silkuneed, pam, and she shipped me some samples that were not available on her website. i was able to match my paint exactly!

so, i ordered up 14 yards at $8.99. add on the thread i needed at $3.99, and i had the equivalent of what would have cost well over $700 at pottery barn for under $130.

next was a pit stop to hancock fabrics for thread and black-out lining. at $5.99 a yard, this is a very good investment. it helps with city noise reduction, heat retention, and lets me sleep past 6:30am - when my room turns into a vampire's worst nightmare (that link is for you, melissa. i still refuse to give in!)... you know, minus the crosses, holy, water, garlic and silver stakes (unless you count the hand-dandy maglite 4-cell i keep next to my bed as a silver stake).

OKAY - time to head back to mom's house and get to stitchin'!

step one: roll out black-out liner nice and flat. smooth with your hand.

step two: line up cut fabric ends and roll silk onto liner. smooth as well. (*note: if you're using a fabric that looks different on each side, place the side you want to display away from you - i.e. when you roll it out, you should see the back of your fabric.)

step three: pin top and sides. pin further than the length of your curtain.

step four: measure both sides to desired length. my windows are 108" high, so i opted for 112". i wanted them to puddle gracefully on the floor (this also allows for more error than ones that skim the floor - you'll need to be much more precise).

step 5: using a fabric marker and a level, draw a straight line across your fabrics. cut along this line and pin next curtain top as you go.

step 6: (ask mom to) sew top and sides of curtain to liner.

step seven: trim excess fabric around your hems.

step eight: turn panel inside out and smooth.

step nine: (ask mom to) stitch bottom as desired. i like to do this by hand so you see no thread at all on the finished curtain. (but you could just as easily zip along the edge with a machine in 30 seconds.)

REPEAT steps 1-9 as necessary.

step 10: hang your lovely curtains! i bought simple satin nickel double rods by levolor at home depot for $24.99 a piece. to hang the panels, i bought 1" nickel drapery clips at target for $4.99 a pack (one per panel).

these make hanging curtains a snap. just clip them and go! and the look is much cleaner than pole pockets (*blech*).

i'm still working on the tiebacks (and the sheers that will hang behind the curtains), but you can buy or make whatever you like. you'll see them in my bedroom "afters" soon.

here's a breakdown of what i spent:

silk: 14 yards at $8.99 - $125.86
black-out fabric: 14 yards @ $5.99 - $83.86
thread: $3.99 for one roll
curtain rods: $24.99 x 4 - $99.96
drapery clips: $4.99 x 4 - $19.96

TOTAL: $333.63 (compared with well over $1000 at pottery barn or equivalent) and about 2 hours of sewing.

this is a project that saves you LOTS of cash and can be done by even the most "beginner" of sartors and seamstresses (though my mom is a PRO).

hope you've enjoyed this how-to! let me know if you have questions!

and a BIG KISS to mom for all of the help! xx

16 October 2009

damn you, ikea! *shakes fist*

damn you, that is, for having such utterly charming things at such low prices that i think i can afford something like 2000 hours of labor to furnish my home!

in all seriousness, though, i believe that good design should be available at any price range. and along those lines, i also believe, that if with good vision or proper guidance, you can make a lovely home from places like ikea, target, cost plus and pier 1 (not to mention that almost my entire wardrobe is from forever 21).

so, while my dad was in town, off to ikea we went with my pre-printed shopping list. we bought about *5000 pounds* of furniture; here's a look at some of the pieces i chose.

next week i'll show you where it all went with some pretty amazing before and sort-of-after shots of the house.

a four-poster bed (edland)!

a couple of nice dressers, also edland line, 5-drawer and 2-drawer.
(these came with AWFUL pulls, so i swapped them out with some knobs that i picked up at anthropologie - appropriately labeled "diamond gal" - that i loved for their sparkle and organic feel)


a sideboard (trollsta) to use as a tv stand and a great b/w rug (stockholm rand)

and a fantastic stainless steel topped desk (vika) with a matching rug (alvine rand)

and 3 billy bookshelves waiting to be assembled *sigh*

this was an incredibly productive shopping spree - all for well under $2000.

aren't you curious how i put it all together...?

09 October 2009

project doorway


(l-r) benjamin moore "magenta" in the master bedroom closets, behr "sailboat blue" in the upstairs bath, and chalkboard paint in the guest bath


whether you're saying "auf wiedersehen" or "guten tag" in this house, i hope you'll enjoy it just the same.

one of my favorite projects i have christened "project doorway" (in honor of one of my very favorite tv shows).

my goal is to paint the inside of every door. i love a little (and unexpected) pop of color!

here are a few of the doors that i have been working on. i have MANY to go, but this is a good start!

"make it work!"
Related Posts with Thumbnails

Followers